
Lakeville Wood Flooring has repaired water damaged hardwood floors across Lakeville, MN for more than 20 years, serving surrounding cities including Farmington, Apple Valley, Burnsville, Savage and Elko New Market. Dishwasher and refrigerator leaks, failed supply lines, ice dams, sump pump failures and window wells that filled faster than they drained all end up as the same call, and they all turn on the same two questions: how far did the water actually go, and where is the replacement allowed to stop.
We answer the first with a moisture meter on a grid rather than by eye. The wet area is almost always larger than the stained area, and the boards that look worst are not reliably the boards that are worst. Those readings are the record everything else is built on, and taking them early is worth more than any amount of inspection later.
The second question is an insurance question, and we raise it in writing with your adjuster before any tear-out. Like kind and quality is a standard that gets interpreted, and it is interpreted while the continuous run and the doorways can still be photographed. Once the wet room is open, the evidence that would have supported a full run is gone, and that is a conversation we would rather have on day one.
Reading the Damage Before Anything Comes Out
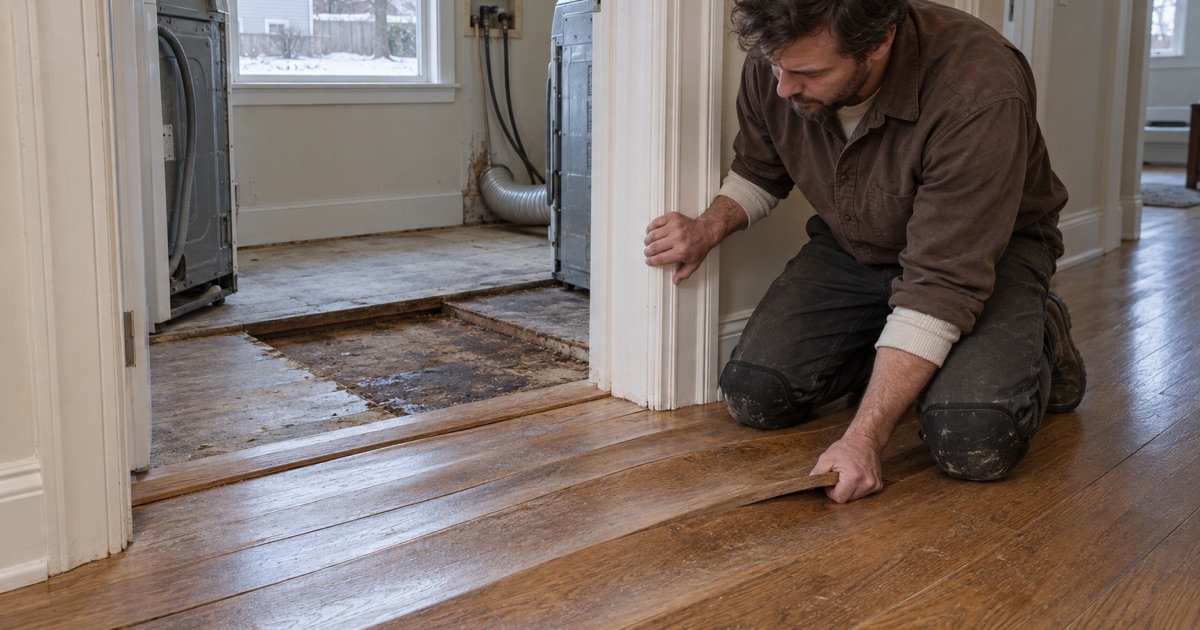
Mapping the Wetting With a Meter
We take readings across the field, into adjacent rooms and at doorways, using a pin meter where a depth reading matters and a pinless meter to sweep quickly. The pattern that comes back shows the direction the water traveled and where it stopped, which is frequently well beyond the visible mark. That map sets the repair boundary and goes into the written scope.
Cupping, Crowning and Compression Set
Cupping is edges high and means the underside is wetter than the top, so it is a drying problem before it is a sanding problem. Crowning is centers high and usually means somebody sanded a cupped floor before it dried. Compression set is permanent: boards squeezed hard enough against each other that their fibers crushed, leaving gaps that stay open after the floor dries. The first two can resolve, the third does not, and telling them apart decides the scope.
Delamination and Adhesion Failure
On an engineered floor, the failure to look for is separation between plies, which is not repairable and means replacement of the affected boards. Under a glue-down, hollow spots and adhesion failure mean the water got beneath the floor and released the bond. Neither is visible from a standing position, so we sound the floor and check at cut edges rather than judging from the surface.
Drying the Floor Properly
Stop the Source First
Nothing about drying matters while water is still arriving. A weeping supply line, a failed sump, a window well with nowhere to drain and a slab pushing moisture from below all keep a floor wet in ways that look identical from above. We identify which one is in play, and where it is outside our trade we say so plainly rather than drying around it.
Dry Evenly, and to a Number
A floor dried too fast from one side checks, and one dried from the top while the underside stays wet stays cupped. The aim is even drying back to the floor’s equilibrium moisture content, monitored with readings rather than assumed from a schedule. In a closed house through the heating season that is often faster than people expect; in a humid stretch it is slower, and we report the numbers either way.
Why Nothing Gets Sanded Yet
The most expensive mistake available on a wet floor is sanding it flat while it still holds water. It looks like progress and it produces a crowned floor the moment the remaining moisture leaves, which then needs a second sanding and enough thickness left to allow one. We hold the sanding until the meter says the floor is stable, even when that is not the answer anyone wants.
The Repair Itself
Board Replacement and Weaving In
Failed boards are cut out and new material is woven in with staggered end joints and laced into the surrounding field, so the repair does not read as a rectangle. Species, cut and width are matched before anything is ordered, and where the original floor is discontinued we say at the quote whether a close match blended with stain or a planned transition is the honest route.
Subfloor, Fasteners and What the Water Left Behind
Water that reached the boards usually reached the decking under them. We check the subfloor’s moisture content, look for swollen panel edges that will telegraph through a new floor, and replace decking back to joist centers where it has lost strength. Fasteners that corroded or backed out are dealt with at the same time, because they become next winter’s ticking otherwise.
Blending the Repair Into the Existing Floor
New wood set into an aged floor starts lighter, and the blend is made with a penetrating stain sampled on your own boards rather than on a chip. Where the floor is site-finished, the repair is sanded and coated into the room so the sheen carries through. On a prefinished floor the match is limited by what the factory still makes, and we set that expectation before starting rather than after.
Insurance, Documentation and the Floor Run
Where the Replacement Run Ends
The argument on a flooring claim is rarely about the soaked boards; it is about how far the replacement has to carry before a break is acceptable. A floor running continuously from a kitchen through a hall into a living room does not have a natural stopping point, and that is exactly the case worth documenting. We put it to the adjuster in writing at the start.
Documenting Before Demolition
Photographs of continuous runs, doorways and transitions, plus the moisture map and the readings behind it, are assembled before anything is removed. This is the single highest-value hour on a claim, and it is available only once. A scope built on that record is far harder to reduce than one built on a description written after the room was emptied.
Working Alongside Restoration
Mitigation crews dry the structure; they are not usually deciding what a hardwood floor needs. We keep our own readings and our own scope so that the flooring decisions are made on flooring evidence, and we hand you something in writing that both the restoration company and the adjuster can work from.
Our Step-by-Step Water Damage Repair Process
Assess and Record on the First Visit
The visit produces a moisture map, interior relative humidity with the specified 30 to 50 percent band noted beside it, a read on the subfloor, and an assessment of whether cupping, crowning, compression set, delamination or adhesion failure is present. All of it is written down the same day.
Raise the Boundary Question Immediately
Before any tear-out, the question of where the replacement run ends goes to the adjuster in writing along with the documentation. Getting an answer here, while everything is intact, is what keeps the scope from being decided by whoever demolishes first.
Dry, Monitor and Wait for Stability
The source is stopped, drying is set up to work evenly, and readings are taken until the floor is stable rather than until a date arrives. Boards that are going to recover are given the chance; boards with compression set or delamination are identified as replacements and not held out hope for.
Replace, Sand and Hand Back in Writing
Damaged boards come out, the subfloor is made sound and flat, new material is woven in and blended, and the area is sanded and coated to the written grit sequence and finish schedule. Dustless containment with a HEPA vacuum keeps a closed house workable, and the return-to-service times come back to you in writing rather than as a guess at the end of the job.
- 20+ Years in the Trade
- Free Written Estimates
- Moisture Readings on Every Quote